The most common way this goes wrong: someone DMs their tattoo artist a screenshot from Instagram — their dog’s face, slightly blurry, taken at an angle in mixed lighting — and writes “something like this on my forearm, maybe 4 inches?” The artist replies with a custom design quote that’s twice what the person expected. The conversation stalls. The tattoo never happens.
What went wrong isn’t the idea. The idea is good. What went wrong is the gap between a reference photo and a tattoo design — and most people don’t know the gap exists until they’re on the wrong side of it.
The direct answer: A photo can’t go directly from your phone to a tattoo needle. It needs to be converted into a tattoo-ready design first — clean line work your artist can work from, at the correct scale, without a background. The conversion can happen three ways: AI tools (fastest), your artist doing a custom sketch from reference (most common but adds cost and time), or manual vector tracing (best for logos and geometric shapes). Understanding which approach fits your photo saves both money and confusion.
Why Photos Don’t Go Straight from Your Camera Roll to a Tattoo
Tattoo ink sits in the dermis — the second layer of skin. The way it’s deposited means designs need to be high-contrast, have defined edges, and work in a format that translates to needle movement. A photograph has none of those properties.
A photo captures every tone, texture, gradient, and shadow in continuous variation. A tattoo design works in discrete lines and fills. Fine photographic detail — the delicate fur texture in your cat’s face, the subtle shadows in a portrait — either disappears into the skin over time or requires so much ink density that it turns into a blob within a decade. What looks precise at print resolution looks muddy when it’s 3 inches on a forearm.
The conversion process bridges that gap. It strips away photographic complexity and translates the image into the vocabulary tattoos understand: line weight, filled areas, negative space. The best converted designs look like they were always meant to be tattooed. The worst look like someone ran a filter over a photo and called it done.
The Three Conversion Methods (and What Each Actually Produces)
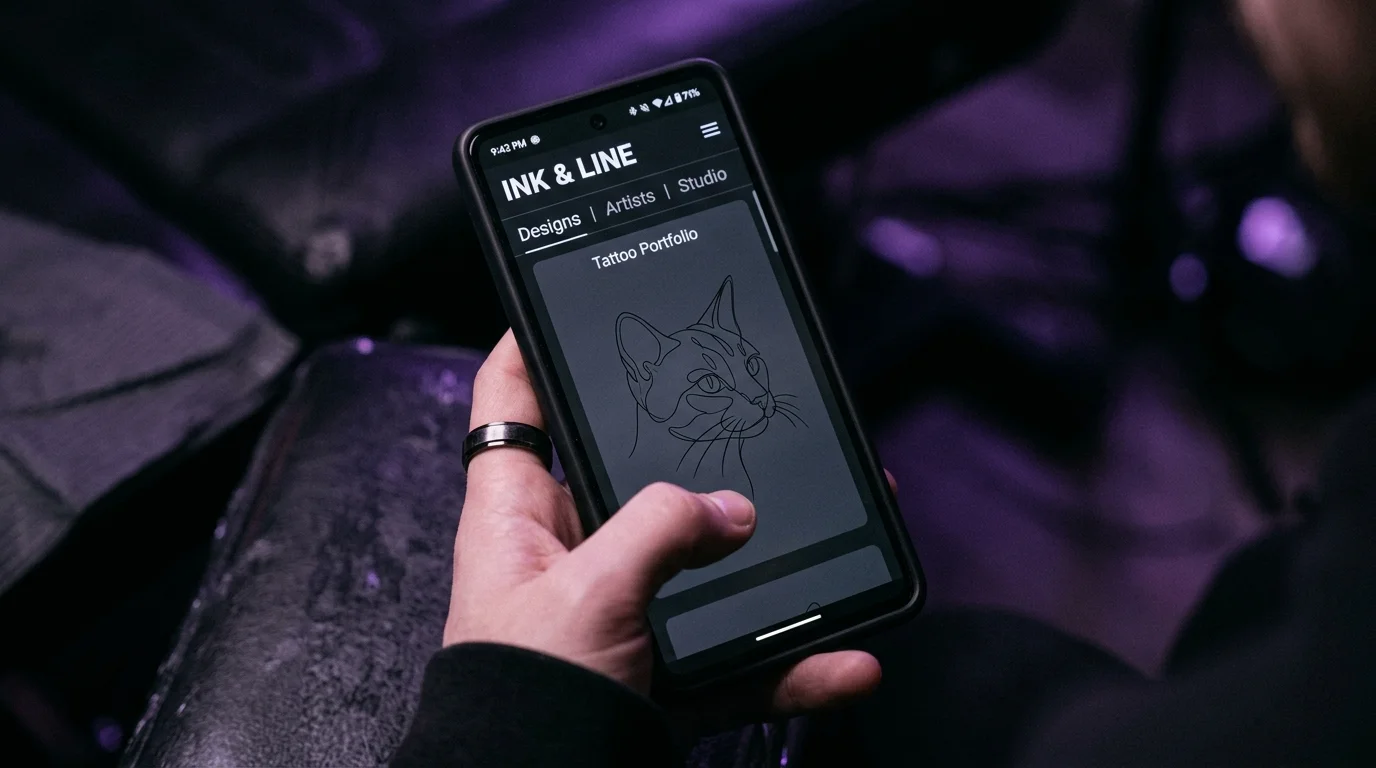
AI conversion tools. The fastest route. Upload your photo, and the AI generates a tattoo-ready version — linework, fills, simplified detail — in seconds. Apps like TattThat convert photos directly and let you immediately preview the result on a photo of your own skin, which is useful before you’ve invested in a consultation. The output quality depends on your photo: clean, high-contrast images produce excellent results; cluttered backgrounds produce cluttered designs.
Best for: pet portraits, object photos, simple portraits, nature photography with a clear subject. Any photo where one thing is clearly the subject and the background isn’t competing.
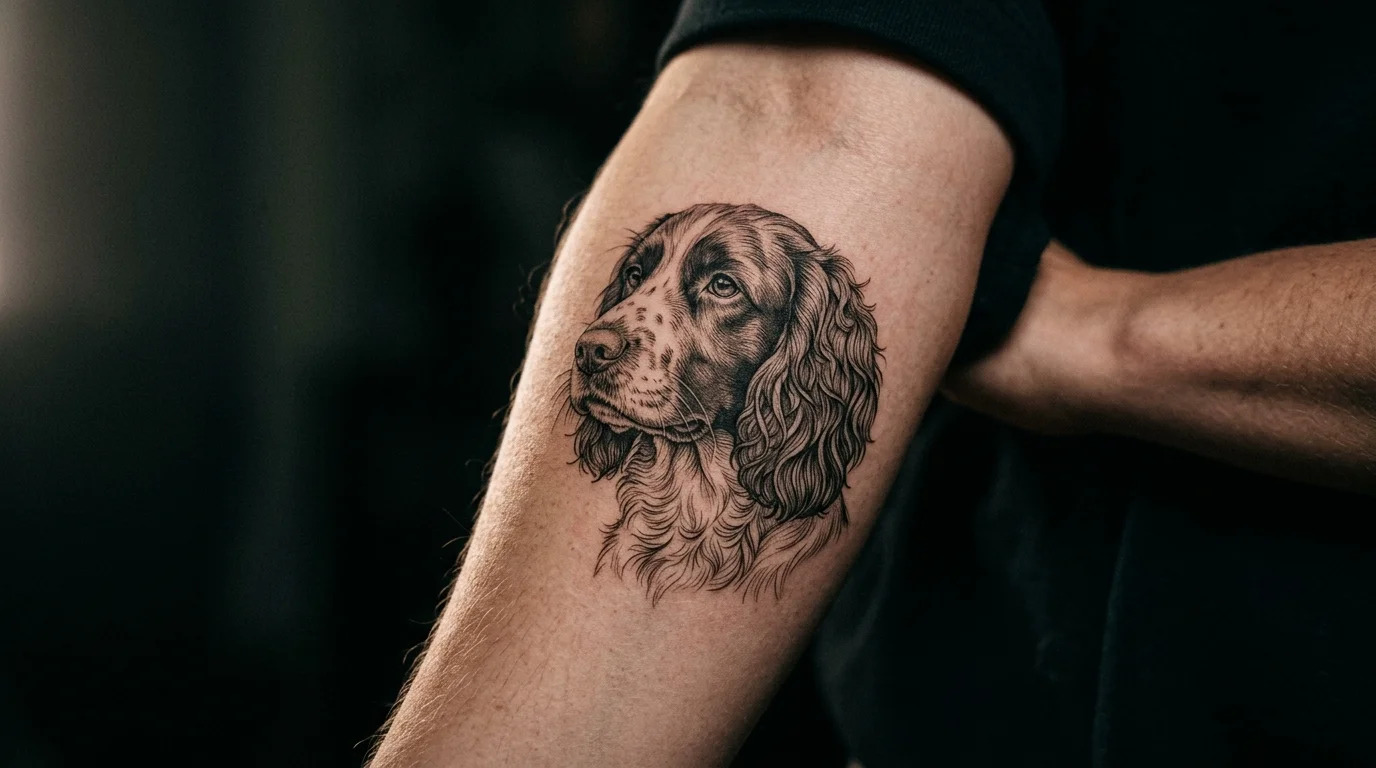
Artist custom sketch from reference. You show your artist the photo. They sketch a tattoo design from it. This is still the standard approach for complex custom work — a portrait with emotional significance, a design that needs to capture something specific about a person’s face, or anything requiring artistic judgment about what to simplify. It takes time and is included in custom design fees (usually factored into the hourly rate or a flat design fee of $50–200 depending on complexity).
Best for: portraits of people, complex memorial pieces, anything requiring specific likeness accuracy.
Manual vector tracing. You (or a designer) trace the key lines and shapes of the photo in vector software and export clean line art. This produces the most technically clean result — crisp lines, exact control over what’s included — but requires design skill or a paid freelancer.
Best for: logos, text-heavy designs, geometric or architectural references where precision matters more than organic quality.
What Makes a Photo Convert Well
Not all photos are equal starting material. The difference between a clean conversion and a cluttered mess usually comes down to three things.
Contrast. The subject needs to be clearly distinguishable from the background. A black dog on a dark couch is hard to convert — the edges don’t read. The same dog on a light-colored wall converts cleanly. If your reference photo has the subject merging visually with the background, either reshoot with a contrasting background or expect the converted design to need manual cleanup.
Resolution. The more pixels, the more detail the conversion has to work with. Blurry or heavily compressed images produce blurry designs. As a minimum, 1000px on the short side gives the algorithm enough information. High-resolution DSLR shots or modern smartphone portrait-mode photos at full resolution are ideal. Screenshots of screenshots — avoid these entirely.
Simplicity. A single clear subject is easier to convert than a group photo. One pet face converts cleanly. Five dogs wrestling in a pile does not. If your reference has complexity you don’t want in the tattoo, crop or edit the photo before converting — or tell your artist exactly which element to focus on.
If your photo is of a pet specifically, the considerations go a layer deeper — from picking the right angle to deciding how much detail to preserve as the design ages. Our guide to turning your pet’s photo into a real tattoo walks through that process end to end.
Before Your Consultation: See It on Your Skin First
Here’s where most people lose time they didn’t know they were losing. You do the conversion. You have a design. You book a consultation, the artist does their own refinement, and only then do you see it placed on your arm — in the chair, with the stencil, about to be permanent.
That’s late to find out the scale is wrong. Or the placement doesn’t look right. Or the proportions you imagined don’t match what’s sitting on your actual forearm.
Before you walk in, use TattThat to place the converted design on a photo of your own skin. This is particularly valuable for custom photo conversions, because you’ve likely spent time and emotional investment in this design — a pet, a memorial piece, something meaningful. The specific fear is: does this personal image actually work as ink on my body? The placement test answers that before anyone has picked up a machine.
Upload the converted design, load your arm photo, drag the design to the placement you’re considering. Check the scale. Try the wrist and the forearm. If you converted a pet portrait, see whether the linework reads at 3 inches or needs to be 4 — there are specific rules for how detail complexity dictates minimum tattoo size that are worth understanding before you finalize. Bring the preview screenshot to your consultation instead of just a reference photo — your artist immediately understands the direction, and the design conversation goes faster.
Psychology Today research confirms that meaningful, identity-connected designs are the most satisfying tattoos long-term — the people who get custom personal designs tend to be more committed to the result than those choosing from flash. The extra step of verifying the design works on your body before booking is how you protect that investment.
Getting It to Your Artist
Once you have a converted design you’re happy with — whether from an AI tool, your own editing, or a sketch you’ve iterated on — here’s how to hand it off effectively.
File format: PNG or PDF at the highest resolution you have. Never send a screenshot. Never send the preview version — send the source file.
Include the reference. Send both the converted design and the original reference photo. Your artist wants to understand what the subject actually looks like so they can refine intelligently. The AI version is a starting point, not a final brief.
Be specific about what to preserve. “I want the shape of her nose exactly” is more useful than “make it look like her.” Identify the 2–3 elements that are non-negotiable and say so. Let your artist make judgment calls on everything else.
Show the scale and placement you want. If you’ve done a preview, send that screenshot. A note saying “4 inches on the outer forearm, horizontal orientation” combined with a preview image takes five minutes of guesswork out of the consultation.
AARP’s body modification research found that 75% of tattooed adults are completely satisfied with their decision. The people who weren’t are largely concentrated in the category of designs that didn’t look the way they imagined — not because of artist execution, but because the brief was unclear going in. The cleaner your starting design and the more specific your direction, the closer the finished tattoo matches the thing you had in mind.
The Alliance of Professional Tattooists recommends clients come prepared with the best reference material possible — clear, detailed reference helps artists produce better work and reduces rounds of revision. A converted design, even an AI draft, is better starting material than a vague screenshot.
The photo on your phone is a starting point. What you’re building toward is a converted, placed, previewed design that you’ve already seen on your skin. That’s what an artist can actually work from.
The same process applies to meaningful symbolic designs, not just literal photos. The birth flower tattoo guide covers how botanical motifs translate across styles — useful if you’re starting from a reference image of a specific flower rather than a photo of something personal.
See It on Your Skin Before You Commit
Upload a photo, pick a design, and see exactly how it'll look — in seconds. 2 free previews, no card required.
Try TattThat Free →